
Level Adjuster
Level Adjuster is specialized to adjust the volume. Drop the want to adjust the file, please change the volume, and then stored in a slider. There is also analysis capabilities to match by the volume with a single click.
To try it out
-
Show Level Adjuster tab.
(Choose menu Window -> FCAudioTools -> Level Adjuster)
-
Drop files to edit from project tab to the Level Adjuster window.
-
Use the Level Adjuster to the editing of the volumes.
-
Choose All save button (overwrite only).

Is this tool necessary in any case?
Such as prototypes or hobby, sound experts Let the assumed not to participate. It will download the audio material of BGM and sound effects from a variety of services. The problem is not uniform the volume of each sound material.
There is a loudness standard in the professional studio. However, it is rare that the rule has been applied in the sound material. Therefore, you may need to adjust these soundtracks. For example, the sound effect will be a minimal state for the BGM.
There is a way to set through the operation of AudioSource.volume through Unity in the runtime script and the function of the sound extension asset. However, Level Adjuster will make modifications to the sound material itself.
This is easy to the diversion of adjustment file. Scripts that do not need the volume control can be further simplified. (It is always for the sake of balance is AudioSource.volume = 1)
Basic functions
Drag and drop to Level Adjuster from the project tab files. You will see been read files.
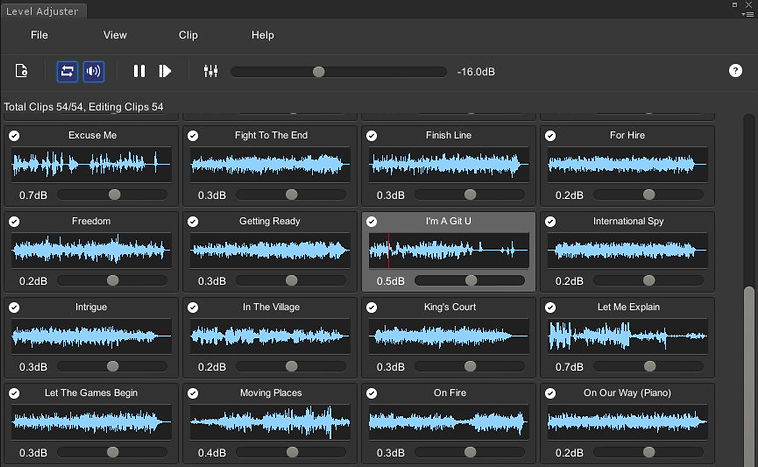
When you click the clip, it is the state that has been selected. The sound of the active clip will start playing automatically.
Note
If you want to disable the automatic playback and loop, switch the toggle in the toolbar.
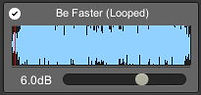
You may change the volume of the sound by moving the knob of the slider in the right and left. The left key and the right key may be adjusted in 0.1dB unit using. Change the volume will be immediately reflected in the playback, but it is not saved in the file at this point. It will be compared to hear its sound by selecting a different clip. Repeat until the necessary balance for all of the sounds. Checkmark appears in the upper left corner of the modified clip.

Quiet

Neutral
Loud
Right-click in the current clip appears the clip menu.
Gain Reset
Reset the change volume settings.
Set Reference Clip
It sets the current clip to the reference clip of the slots.
Select the asset
A sound asset in the project tab to the selected state.
Open
Send a clip of the asset to WaveEditor or external applications.
Preview Play
Start play back.

Preview Stop
Stop play back.
Remove from list
Excluded from the clip list. It does not delete files in this operation.
Save
To save your edits of the clip if you want to save only a single file to select this item.
Volume analyze
Volume analysis is roughly adjusted to the reference volume. To have a range width of the volume, the default is -16dB. Using the slider, it may be changed to between -24dB and -4 dB.
To start the analysis, click the Start Analyze button. The analysis is running in the background. It may perform other tasks, but analysis by the play state change or script compilation is stopped. After analysis, all the clips dB slider is changed to conform to base dB. RMS value and peak dB value of the analysis will be displayed in a tooltip.


Reference clips
Reference clip is a bookmark of the clip. A clip of interest from the clip list may be displayed on the top of the window.
It by always displaying the clip into the screen. Comparison of the sounds can be easy. Reference clip behaves like a clip list. It can be used up to 4 slots.

To set the reference clip will choose from the clip menu.
Choose Set to Reference Clip > Slot number.

Continuous playback mode
Continuous playback mode will play all of the clips. If you want to watch all of the sounds on the clip list you should use this feature. When you click the Continuous playback button on the toolbar, it will playback from the current clip to the final clip.
